Ice cream (derived from earlier iced cream or cream ice) is a frozen dessert usually made from dairy products, such as milk and cream and often combined with fruits or other ingredients and flavours. Most varieties contain sugar, although some are made with other sweeteners. In some cases, artificial flavourings and colourings are used in addition to, or instead of, the natural ingredients. The mixture of chosen ingredients is stirred slowly while cooling, in order to incorporate air and to prevent large ice crystals from forming. The result is a smoothly textured semi-solid foam that is malleable and can be scooped.
The meaning of the phrase "ice cream" varies from one country to another. Phrases such as "frozen custard", "frozen yogurt", "sorbet", "gelato" and others are used to distinguish different varieties and styles. In some countries, such as the United States, the phrase "ice cream" applies only to a specific variety, and most governments regulate the commercial use of the various terms according to the relative quantities of the main ingredients. Products that do not meet the criteria to be called ice cream are labelled "frozen dairy dessert" instead. In other countries, such as Italy and Argentina, one word is used for all variants. Analogues made from dairy alternatives, such as goat's or sheep's milk, or milk substitutes, are available for those who are lactose intolerant, allergic to dairy protein, or vegan. The most popular flavours of ice cream in North America (based on consumer surveys) are vanilla and chocolate.
inggridient:
1 (14 ounce) can sweetened condensed milk
1/2 cup unsweetened cocoa powder
2 cups heavy cream
1 cup light cream
1 tablespoon vanilla extract
1/2 cup chopped pecans
1 cup miniature marshmallows
how to cook:
In a medium saucepan over low heat, cook and stir condensed milk and cocoa until smooth and slightly thickened, 5 minutes. Remove from heat , and allow to cool slightly. Stir in heavy cream, light cream, and vanilla. Refrigerate until cold.
Pour mixture into the canister of an ice cream maker, and freeze according to manufacturer's directions. Stir in nuts and marshmallows halfway through the freezing process.
top 15 delicous food in the world
Sunday 13 July 2014
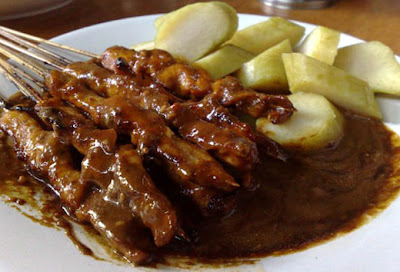
14. Satay Indonesian
modern Indonesian and Malay spelling sate, is a dish of seasoned, skewered and grilled meat, served with a sauce. Satay may consist of diced or sliced chicken, goat, mutton, beef, pork, fish, other meats, or tofu; the more authentic version uses skewers from the midrib of the coconut palm frond, although bamboo skewers are often used. These are grilled or barbecued over a wood or charcoal fire, then served with various spicy seasonings.
Sate Ponorogo being grilled in a foodstall in Surabaya, East Java, Indonesia
Satay originated in Java, Indonesia. It is available almost anywhere in Indonesia, where it has become a national dish. It is also popular in many other Southeast Asian countries, including Malaysia, Singapore, Brunei, the Philippines, and Thailand, as well as in Suriname and the Netherlands, as Indonesia and Suriname are former Dutch colonies.
Satay is a very popular delicacy in Indonesia; the country's diverse ethnic groups' culinary arts (see Indonesian cuisine) have produced a wide variety of satays. In Indonesia, satay can be obtained from a travelling satay vendor, from a street-side tent-restaurant, in an upper-class restaurant, or during traditional celebration feasts. In Malaysia, satay is a popular dish—especially during celebrations—and can be found throughout the country.
Close analogues are yakitori from Japan, shish kebab from Turkey and the Middle East, shashlik from the Caucasus, chuanr from China, and sosatie from South Africa. It is listed at number 14 on World's 50 most delicious foods readers' poll complied by CNN Go
inggridient :
8-12 skinless chicken thighs, cut into thin strips (For a vegetarian version, see my: Thai Vegetarian Satay)
1 package wooden skewers
SATAY MARINADE:
1/4 cup minced lemongrass , fresh or frozen
2 shallots OR 1 small onion, sliced
3 cloves garlic
1-2 fresh red chilies, sliced, OR 1/2 tsp. to 1 tsp. cayenne pepper, to taste
1 thumb-size piece galangal OR ginger, thinly sliced
1 tsp. minced fresh turmeric OR 1/2 tsp. dried turmeric
2 Tbsp. ground coriander
2 tsp. cumin
3 Tbsp. dark soy sauce (available at Asian food stores)
how to cook :
If using wooden skewers, soak them in water while you prepare the meat (to prevent burning). The kitchen sink works well for this.
Cut chicken into thin strips and place in a bowl.
Place all marinade ingredients in a food processor or chopper. Process well.
Taste-test the marinade - you will taste sweet, spicy, and salty. The strongest tastes should be SWEET and SALTY in order for the finished satay to taste its best. Add more sugar or more fish sauce (in place of salt) to adjust the taste. You can also add more chili if you want it spicier.
Pour the marinade over the meat and stir well to combine. Allow at least 1 hour for marinating, or longer (up to 24 hours).
When ready to cook, thread meat onto the skewers. Tip: Fill up to 3/4 of the skewer, leaving the lower half empty so that the person grilling has a "handle" to easily turn the satay during cooking.
Grill the satay on your BBQ, OR on an indoor grill, basting the first time you time it with a little of the leftover marinade from the bottom of the bowl. OR you can broil in the oven on a broiling pan or baking sheet with the oven set to "broil" Place satay close beneath the heating element and turn the meat every 5 minutes until cooked (be sure to soak your wooden satay sticks in water before skewering). Depending on how thin your meat is, the satay should cook in 10 to 20 minutes.
13. Chicken Rice Singapore
The prevalence of stalls selling Hainanese chicken rice as their primary specialty in Singapore underscores the dish's unrivalled popularity amongst Singaporeans and overseas visitors. Hainanese chicken rice is considered as one of the "national dish" of Singapore, and is often served at international expositions and global events abroad, and in Singaporean-run restaurants overseas. Hainanese chicken rice is also one of the few local dishes served on Singapore Airlines flights. It is listed at number 45 on World's 50 most delicious foods complied by CNN Go in 2011.
In Singapore, Hainanese chicken rice is served everywhere from school canteens, hawker stalls to major restaurants. . There are Hainanese chicken rice stalls that have established franchise or branch outlets, and these include Five Star Hainanese Chicken Rice, Boon Tong Kee, Loy Kee, Wee Nam Kee and others which have many outlets island wide. It is very common to find Rice Balls in such chain eateries. The price range is around S$2.50-4.50 (the latter if the dish includes a drumstick). Most stalls serve extras such as braised dark soy hard boiled egg, chicken liver, braised dark soy firm tofu (Tau-kwa) and kai-lan with oyster sauce as side dishes and a bowl of plain chicken stock soup. The choice of white (steamed) or roasted chicken is commonly available at almost all eateries.
Hainanese-owned coffee shops tend to serve a variety of Hainanese cuisine, with chicken rice being the main highlight. Other Hainanese dishes include pork chop, vegetables, fish, eggs and char siew. Most of these shops are air-conditioned, and are mainly concentrated at Purvis Street and Seah Street. The dish was popularised in Singapore in the 1950s by Moh Lee Twee, whose Swee Kee Chicken Rice
ingredients
Chile Sauce:
2 to 3 tablespoons freshly squeezed lemon juice
2 tablespoons chopped fresh red chiles
5 cloves garlic, chopped
Salt
Chicken and Rice:
1 (2-pound) chicken
1 scallion, cut into 1-inch pieces
4 slices fresh, peeled ginger
6 tablespoon vegetable oil or olive oil
6 to 8 cloves garlic, finely chopped
4 cups long-grain uncooked rice
1 teaspoon fine salt
Directions
Make the Chile Sauce: Combine all the ingredients in a bowl, mix well, and season with salt, to taste. Set aside
Make the Chicken and Rice: Bring a large pot of salted water to a boil (enough water to immerse the chicken). Stuff the cavity of the chicken with the scallion and ginger. Add the chicken to the boiling water, breast side-down. Lower the heat to a simmer just under boiling point and cook, covered, until just cooked through, about 40 minutes.
Transfer the chicken to an ice water bath for about 5 to 6 minutes. (This is to arrest the cooking and will make the chicken skin crisp.) Drain. De-bone the chicken and cut into bite-sized pieces. Reserve the chicken stock, and keep hot.
Heat the oil in a wok or saucepan over high heat. Add the garlic and stir-fry until fragrant. Add the rice and stir-fry for 1 to 2 minutes. Add enough of the hot reserved chicken soup to reach 1/2- inch above the top of the rice. Bring to the boil, add the salt, and lower the heat to low. When steam holes form in the rice, cover the wok, and steam until cooked, about 30 minutes.
Whisk 1/4 cup of the hot chicken stock into the chile sauce.
Arrange the rice and poached chicken on a platter and drizzle with the chile sauce.
12. Kimchi
The earliest references to pickled vegetables in East Asia are found in the Xin Nan Shan 信南山 poem of the Shi Jing , which uses the character . soaked vegetables), dimchae, and timchae were adopted in the period of the Three Kingdoms of Korea.[6] The word then was modified into jimchi, and is currently kimchi
Early kimchi was made of cabbage and beef stock only. Red chili, a New World vegetable not found in Korea before European contact with the Americas, was introduced to Korea from Japan after the Japanese invasions (1592–1598) and became a staple ingredient in kimchi, although its use was not documented until the 18th century. Red chili pepper flakes are now used as the main ingredient for spice and source of heat for many varieties of kimchi. In the twelfth century other spices, creating flavors such as sweet and sour, and colors, such as white and orange, were added
Ingredients
1 (2-pound) head napa cabbage
1/4 cup sea salt or kosher salt (see Recipe Notes)
Water (see Recipe Notes)
1 tablespoon grated garlic (about 5-6 cloves)
1 teaspoon grated ginger
1 teaspoon sugar
2-3 tablespoons seafood flavor or water (optional, see Recipe Notes)
1-5 tablespoons Korean red pepper flakes (gochugaru)
8 ounces Korean radish or daikon, peeled and cut into matchsticks
4 scallions, trimmed and cut into 1-inch pieces
Equipment
Cutting board and knife
Large bowl
Gloves (optional but highly recommended)
Plate and something to weigh the kimchi down, like a jar or can of beans
Colander
Small bowl
Clean 1-quart jar with canning lid or plastic lid
Bowl or plate to place under jar during fermentation
Instructions
Cut the cabbage. Cut the cabbage lengthwise into quarters and remove the cores. Cut each quarter crosswise into 2-inch-wide strips.
Salt the cabbage. Place the cabbage and salt in a large bowl. Using your hands (gloves optional), massage the salt into the cabbage until it starts to soften a bit, then add water to cover the cabbage. Put a plate on top and weigh it down with something heavy, like a jar or can of beans. Let stand for 1-2 hours.
Rinse and drain the cabbage. Rinse the cabbage under cold water 3 times and drain in a colander for 15-20 minutes. Rinse and dry the bowl you used for salting, and set it aside to use in step 5.
Make the paste. Meanwhile, combine the garlic, ginger, sugar, and seafood flavor (or 3 tablespoons water) in a small bowl and mix to form a smooth paste. Mix in the gochugaru, using 1 tablespoon for mild and up to 5 tablespoons for spicy (I like about 3 1/2 tablespoons).
Combine the vegetables and paste. Gently squeeze any remaining water from the cabbage and return it to the bowl along with the radish, scallions, and seasoning paste.
Mix thoroughly. Using your hands, gently work the paste into the vegetables until they are thoroughly coated. The gloves are optional here but highly recommended to protect your hands from stings, stains, and smells!
Pack the kimchi into the jar. Pack the kimchi into the jar, pressing down on it until the brine rises to cover the vegetables. Leave at least 1-inch of headspace. Seal the jar with te lid.
Let it ferment. Let the jar stand at room temperature for 1-5 days. You may see bubbles inside the jar and brine may seep out of the lid; place a bowl or plate under the jar to help catch any overflow.
Check it daily and refrigerate when ready. Check the kimchi once a day, pressing down on the vegetables with a clean finger or spoon to keep them submerged under the brine. (This also releases gases produced during fermentation.) Taste a little at this point, too! When the kimchi tastes ripe enough for your liking, transfer the jar to the refrigerator. You may eat it right away, but it's best after another week or two.
Recipe Notes
Salt: Use salt that is free of iodine and/or anti-caking agents, which can inhibit fermentation.
Water: Chlorinated water can inhibit fermentation, so use spring, distilled, or filtered water if you can.
Seafood flavor and vegetarian alternatives: Seafood gives kimchi an umami flavor. Different regions and families may use fish sauce, salted shrimp paste, oysters, and other seafood. Use about 2 tablespoons of fish sauce, salted shrimp paste, or a combination of the two. For vegetarian kimchi, I like using 3/4 teaspoon kelp powder mixed with 3 tablespoons water, or simply 3 tablespoons of water.
11. Lasagna
Lasagne originated in Italy, traditionally ascribed to the city of bologna , where the first modern recipe was created and published and became a traditional dish. Traditional lasagne is made by interleaving layers of pasta with layers of sauce, made with . In other regions and outside of Italy it is common to find lasagne made with ricotta or mozarella cheese, tomato sauce, various meats (e.g., ground beef, pork or chicken), miscellaneous vegetables (e.g., spinach, zucchini, mushrooms) and typically flavored with wine, garlic, onion, and oregano. In all cases the lasagne are oven-baked.
Emilia-Romagna’s intensive farming economy in the northern region of Italy results in plentiful dairy and meat products, and their commonality in regional cooking – more so than the olive oil found in southern regions of Italy. Pastas from Emilio-Romano and its capital, Bologna, are almost always served with a ragu, a thick sauce made from ingredients such as onions, carrots, finely chopped pork and beef, .
ingridient
1 pound sweet Italian sausage
3/4 pound lean ground beef
1/2 cup minced onion
2 cloves garlic, crushed
1 (28 ounce) can crushed tomatoes
2 (6 ounce) cans tomato paste
2 (6.5 ounce) cans canned tomato sauce
1/2 cup water
2 tablespoons white sugar
1 1/2 teaspoons dried basil leaves
1/2 teaspoon fennel seeds
1 teaspoon Italian seasoning
1 tablespoon salt
1/4 teaspoon ground black pepper
4 tablespoons chopped fresh parsley
12 lasagna noodles
16 ounces ricotta cheese
1 egg
1/2 teaspoon salt
3/4 pound mozzarella cheese, sliced
3/4 cup grated Parmesan cheese
how to cook:
In a Dutch oven, cook sausage, ground beef, onion, and garlic over medium heat until well browned. Stir in crushed tomatoes, tomato paste, tomato sauce, and water. Season with sugar, basil, fennel seeds, Italian seasoning, 1 tablespoon salt, pepper, and 2 tablespoons parsley. Simmer, covered, for about 1 1/2 hours, stirring occasionally.
Bring a large pot of lightly salted water to a boil. Cook lasagna noodles in boiling water for 8 to 10 minutes. Drain noodles, and rinse with cold water. In a mixing bowl, combine ricotta cheese with egg, remaining parsley, and 1/2 teaspoon salt.
Preheat oven to 375 degrees F (190 degrees C).
To assemble, spread 1 1/2 cups of meat sauce in the bottom of a 9x13 inch baking dish. Arrange 6 noodles lengthwise over meat sauce. Spread with one half of the ricotta cheese mixture. Top with a third of mozzarella cheese slices. Spoon 1 1/2 cups meat sauce over mozzarella, and sprinkle with 1/4 cup Parmesan cheese. Repeat layers, and top with remaining mozzarella and Parmesan cheese. Cover with foil: to prevent sticking, either spray foil with cooking spray, or make sure the foil does not touch the cheese.
Bake in preheated oven for 25 minutes. Remove foil, and bake an additional 25 minutes. Cool for 15 minutes before serving.
Saturday 12 July 2014
10.Massaman Cury
The origin of the name is not clear, as massaman or matsaman is not a native Thai word. It may have been derived from malay, which means "sour", or from the name of Wan Mat Saman, a prominent chief minister of kedah, which is in present-day Malaysia, but was once a vassal state of Siam.
According to one theory, it originated in central thailand at thecourt ayuthara in the 16th century through a persian envoy and trader. According to another theory, it originated from the south's tai malays Due to its Muslim roots and therefore, this curry is most commonly made with beef, but can also be made with duck, tofu,chiken, or, for non-Muslims, withpork (as pork is a forbidden food for Muslims, this variety is not eaten by observant thai muslim).
The flavoring for Massaman curry is called Massaman curry paste (nam phrik kaeng matsaman). The dish
how to cook
Ingredients:
1/2 to 1 pound chicken pieces OR chopped chicken breast/thigh
1-2 medium potatoes, cut into chunks
1 14 ounce (400 ml) can coconut milk (not lite)
1 small red pepper, thinly sliced
1 medium tomato, sliced
2 Tbsp. coconut oil OR vegetable oil
1/3 cup onion, sliced
1 thumb-piece ginger, grated
4-5 cloves garlic
1 red chili, sliced, OR 1/2 to 3/4 tsp. chili flakes/cayenne pepper
1/2 cup good-tasting chicken stock
1 stalk lemongrass, minced, OR 2-3 Tbsp. frozen/bottled prepared lemongrass
3 bay leaves
1 tsp. turmeric
1/4 cup chopped unsalted dry-roasted cashews (+ handful more to finish)
1 tsp. ground coriander
1 tsp. whole cumin seed
1/2 tsp. white pepper
1/8 tsp. cardamon
1 tsp. tamarind, or substitute 1 Tbsp. lime juice*
3/4 tsp. shrimp paste (available by the jar at Asian stores)
2 Tbsp. fish sauce
2 Tbsp. fish sauce
1 Tbsp. palm sugar OR brown sugar
Preparation:
Heat a wok, large frying pan, or soup-type pot over medium-high heat. Drizzle in the oil and swirl around, then add the onion, ginger, garlic, and chili. Stir-fry 1-2 minutes to release the fragrance.
Add the stock plus the following: lemongrass, bay leaves, turmeric, chopped cashews, ground coriander, whole cumin seed, white pepper, cardamon, tamarind (or lime juice), shrimp paste, fish sauce, and sugar. Stir with each addition and bring to a light boil.
Add the chicken, stirring to coat with the spicy liquid, then add the coconut milk and potatoes. Stir and bring back up to a boil. Reduce heat to low, or just until you get a good simmer.
Simmer 30 to 40 minutes, stirring occasionally, until chicken and potatoes are tender. Add red pepper and tomato during last 10-15 minutes of coooking time. Tip: if you prefer a more liquid curry sauce, cover while simmering. If you prefer a thicker curry sauce, leave off lid.
Taste-test the curry, adding more fish sauce for increased flavor/saltiness, or more chili if you want it spicier. If too sour, add a little more sugar. If too salty or sweet for your taste, add a touch more tamarind or lime juice. If too spicy, add more coconut milk.
Add a handful more cashews and fold in. Transfer to a serving bowl, or plate up on individual plates or bowls. Top with fresh coriander, if desired, and serve with Thai jasmine rice. ENJOY!
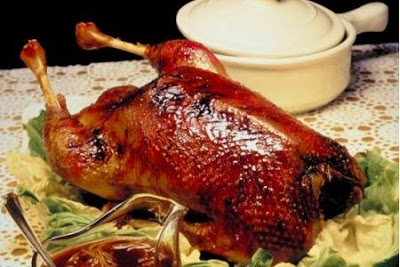
9.Peking Duck
Peking duck is a famous duck dish from beijing
that has been prepared since the imperial era. The meat is prized for
its thin, crisp skin, with authentic versions of the dish serving mostly
the skin and little meat, sliced in front of the diners by the cook.
Ducks bred specially for the dish are slaughtred after 65 days and seasoned before being roasted in a closed or hung oven. The meat is eaten with scallion, cucumber and sweet bean sauce with pancakes rolled around the fillings. Sometimes pickled radish is also inside, and other sauces can be used.
Two notable restaurants in Beijing which serve this dish arequanjude and bianyifang, both centuries-old establishments which have become household names. The two both have their own style: Quanjude is known for using the hung oven roasting m
how to cook
Ingredients
1 large pot 3/4 full with water, boiling
1 whole duck, head on
1/4 cup sugar
1/4 cup salt
1 teaspoon five-spice powder
1 cup molasses
2 cups oil, hot
Directions
Soak the whole duck in the large pot of boiling water. Remove it as soon as the skin changes color.
Sprinkle the inside of the duck with sugar, salt, and five-spice powder. Rub the skin of the duck with molasses. Truss the duck with string and hang in an airing place for 2 hours, or put the duck in the refrigerator overnight without any cover. This will dry the skin of the duck so that it will be crispy.
Preheat rotisserie oven to 375 degrees and bake for 45 minutes or until the skin is reddish brown.
Before serving, pour hot oil over the skin to increase the crispiness. Carve the skin and meat from the duck, and serve.
Read more at: http://www.foodnetwork.com/recipes/peking-duck-recipe0.html?oc=linkback
Subscribe to:
Posts (Atom)